Titanium's Blog


  • Home

  • About

  • Tags

  • Categories

  • Archives

  • Search

Javascript Prototype

Posted on 2019-07-06 | In Front-end , Javascript | | Visitors:

构造函数

每个实例都有一个constructor属性,指向他的构造函数。
每一个原型对象都有一个默认的属性constructor。
每一个constructor都指向一个原型对象。

JS 原型(prototype)

Javascript对象可以从原型对象继承属性,这种原型式继承(prototypal inheritance)是Javascript的核心。原型中定义的函数只在JavaScript加载时被创建一次,创建的每个对象都可以调用原型中的方法。

  • 每个Javascript函数都有一个prototype属性(Function.bind()除外)
  • 每个对象有一个proto属性指向该对象constructor.prototype,但只有函数才有prototype属性

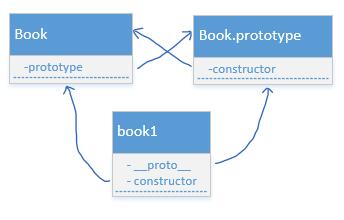
以上面Book类为例, 原型、构造函数和实例对象的关系如下图所示:

constructor-prototype-instance-relation

即:

1
2
3
4
var book1=new Book("Harry Potter","J.K.Rowling");
book1.__proto__===Book.prototype; // true
book1.constructor===Book //true
Book.prototype.constructor===Book // true

所有的函数对象都继承自Function.prototype,因此有:

1
2
3
4
5
6
7
8
9
10
11
12
13
14
15
16
17
18
19
20
21
22
23
24
25
26
27
28
Number.__proto__ === Function.prototype  // true
Number.constructor == Function //true

Boolean.__proto__ === Function.prototype // true
Boolean.constructor == Function //true

String.__proto__ === Function.prototype // true
String.constructor == Function //true

// 所有的构造器都来自于Function.prototype,甚至包括根构造器Object及Function自身
Object.__proto__ === Function.prototype // true
Object.constructor == Function // true

// 所有的构造器都来自于Function.prototype,甚至包括根构造器Object及Function自身
Function.__proto__ === Function.prototype // true
Function.constructor == Function //true

Array.__proto__ === Function.prototype // true
Array.constructor == Function //true

RegExp.__proto__ === Function.prototype // true
RegExp.constructor == Function //true

Error.__proto__ === Function.prototype // true
Error.constructor == Function //true

Date.__proto__ === Function.prototype // true
Date.constructor == Function //true

而Math与JSON以对象形式存在,所以:

1
2
3
4
5
Math.__proto__ === Object.prototype  // true
Math.construrctor == Object // true

JSON.__proto__ === Object.prototype // true
JSON.construrctor == Object //true

再一个例子

1
2
3
4
5
6
7
8
function Person(){}
var person1 = new Person();
console.log(person1.__proto__ === Person.prototype); // true
console.log(Person.prototype.__proto__ === Object.prototype) //true
console.log(Object.prototype.__proto__) //null

Person.__proto__ == Function.prototype; //true
console.log(Function.prototype)// function(){} (空函数)

注意:

  • 大部分prototype都是object类型,但Function.prototype是function类型。
  • Object.prototype.proto=null 由于Object是所有类的父类,类似于根节点,所以其prototype的proto为null。
  • 当试图引用某对象的某属性时,首先会在该对象的内部查找是否有该属性,找不到,就会去对象的proto属性里找,接着又会在proto属性所指的对象的proto里查找,一直查到Object的Protot。

instanceof 运算符

左侧为待测的实例对象,右侧为构造函数(构造函数即类名,是类的共有标识)。instanceof会检查左侧对象是否继承自右侧构造函数的prototype对象。可以不是直接继承。

参考

https://www.jianshu.com/p/dee9f8b14771

Linux:Swap File Usage

Posted on 2019-07-06 | In Linux | | Visitors:

起因

最近在使用pip安装torch时,由于内存不足,导致了Memory Error。pip安装的缓存机制想要先把整个文件读取到内存以后才开始安装,因此可能导致内存不足。

解决方案

  • 方案一 不缓存

    1
    pip --no-cache-dir install xxx
  • 方案二 使用Swap File
    启动swap文件,swap文件在硬盘上开辟一段空间,作为虚拟内存。操作系统会把使用频率低的内容,暂时存放到swap文件内,需要使用时再调用到内存中。
    启动方法,在任意目录下执行以下命令

    1
    2
    3
    4
    5
    6
    # 创建一个512 MB大小的swap文件,大小根据你的需要设置
    dd if=/dev/zero of=/swapfile bs=1024 count=524288
    chown root:root /swapfile
    chmod 0600 /swapfile
    mkswap /swapfile
    swapon /swapfile

完成以上指令后,再次尝试使用pip install xxx 即可成功安装。

若出现以下错误:

1
dd: failed to open ‘/swapfile’: Text file busy

这是因为swapfile处于启动状态,可能正在被使用,因此需要先关掉swapfile:

1
swapoff /swapfile

Pascal VOC 数据集格式详解

Posted on 2019-07-06 | In Computer Vision | | Visitors:

简介

Pascal Voc 格式是目标检测常用的格式。Pascal Voc 数据集官网

目录结构

PASCAL VOC数据集由5个部分构成:JPEGImages,Annotations,ImageSets,SegmentationClass以及SegmentationObject。

  • JPEGImages:存放的是训练与测试的所有图片。
  • Annotations:里面存放的是每张图片打完标签所对应的XML文件
  • ImageSets:ImageSets文件夹下本次讨论的只有Main文件夹,此文件夹中存放的主要又有四个文本文件test.txt,train.txt,trainval.txt,val.txt,其中分别存放的是测试集图片的文件名、训练集图片的文件名、训练验证集图片的文件名、验证集图片的文件名。
  • SegmentationClass与SegmentationObject:存放的都是图片,且都是图像分割结果图,对目标检测任务来说没有用。class segmentation 标注出每一个像素的类别 。object segmentation 标注出每一个像素属于哪一个物体

Annotation的Xml格式

1
2
3
4
5
6
7
8
9
10
11
12
13
14
15
16
17
18
19
20
21
22
23
24
25
26
<annotation>
<folder>17</folder> # 图片所处文件夹
<filename>77258.bmp</filename> # 图片名
<path>~/frcnn-image/61/ADAS/image/frcnn-image/17/77258.bmp</path>
<source> #图片来源相关信息
<database>Unknown</database>
</source>
<size> #图片尺寸
<width>640</width>
<height>480</height>
<depth>3</depth>
</size>
<segmented>0</segmented> #是否有分割label
<object> 包含的物体
<name>car</name> #物体类别
<pose>Unspecified</pose> #物体的姿态
<truncated>0</truncated> #物体是否被部分遮挡(>15%)
<difficult>0</difficult> #是否为难以辨识的物体, 主要指要结体背景才能判断出类别的物体。虽有标注, 但一般忽略这类物体
<bndbox> #物体的bound box
<xmin>2</xmin>
<ymin>156</ymin>
<xmax>111</xmax>
<ymax>259</ymax>
</bndbox>
</object>
</annotation>

LabelImg

用于对图片打标签的软件,可以生成Pascal Voc格式的Xml文件。LabelImg百度云下载链接。
labelImg.png

制作Pascal VOC格式的数据集

  1. 爬取数据集图片放置于JPEGImages文件夹下,注意文件命名(按顺序递增)。
  2. 使用LabelImg进行标注,获取对应图片的XML标注文件,放置于Annotations文件夹下。
  3. 运行如下代码生成ImageSets文件夹
    1
    2
    3
    4
    5
    6
    7
    8
    9
    10
    11
    12
    13
    14
    15
    16
    17
    18
    19
    20
    21
    22
    23
    24
    25
    26
    27
    28
    29
    30
    31
    32
    33
    34
    35
    36
    37
    38
    39
    40
    41
    42
    43
    44
    45
    46
    # -*- coding: utf-8 -*-
    # @Time : 2018/11/12 13:03
    # @Author : lazerliu
    # @File : xml2voc.py
    import os
    import random

    # ==================可能需要修改的地方=====================================#
    g_root_path = "D:/VOCdevkit/VOC2007/" #根路径
    xmlfilepath = "Annotations" # 标注文件存放路径
    saveBasePath = "ImageSets/Main/" # ImageSets信息生成路径
    trainval_percent = 0.98
    train_percent = 0.98
    # ==================可能需要修改的地方=====================================#

    os.chdir(g_root_path)
    total_xml = os.listdir(xmlfilepath)
    num = len(total_xml)
    xml_list = range(num)
    tv = int(num * trainval_percent)
    tr = int(tv * train_percent)
    trainval = random.sample(xml_list, tv)
    train = random.sample(trainval, tr)

    print("train and val size", tv)
    print("train size", tr)
    ftrainval = open(saveBasePath + "trainval.txt", "w")
    ftest = open(saveBasePath + "test.txt", "w")
    ftrain = open(saveBasePath + "train.txt", "w")
    fval = open(saveBasePath + "val.txt", "w")

    for i in xml_list:
    name = total_xml[i][:-4] + "\n"
    if i in trainval:
    ftrainval.write(name)
    if i in train:
    ftrain.write(name)
    else:
    fval.write(name)
    else:
    ftest.write(name)

    ftrainval.close()
    ftrain.close()
    fval.close()
    ftest.close()

How to access server with Jupyter Notebook

Posted on 2019-07-05 | In Data Science | | Visitors:

安装Jupyter

首先登录服务器,输入jupyter notebook检查是否有安装过jupyter。若没有则通过以下指令安装:

1
pip install jupyter

生成Jupyter配置文件

安装完Jupyter之后,输入以下指令生成jupyter配置文件:

1
jupyter notebook --generate-config

配置文件默认会放置在Writing default config to:/root/.jupyter/jupyter_notebook_config.py

生成密钥

命令行输入ipython。

1
$ ipython

import passwd包,使用改包生成密钥

1
2
3
4
5
In[1]: from notebook.auth import passwd
In[2]: passwd()
Enter password:
Verify password:
Out[2]: 'sha1:0000000000000000000000000000000000000000000000000'

编辑jupyter配置文件

输入以下指令,编辑配置文件

1
vim ~/.jupyter/jupyter_notebook_config.py

按i进入编辑模式
该文件的所有配置初始时都是被注释的。需要修改以下的配置,将每一行配置前的#去掉

1
2
3
4
5
6
c.NotebookApp.allow_remote_access = True
c.NotebookApp.allow_root = True ## 表示是否允许jupyter使用root权限
c.NotebookApp.ip = '*'
c.NotebookApp.port = 8888 ##根据自己情况指定
c.NotebookApp.open_browser = False
c.NotebookApp.password = u'sha1:00000000....' ## 刚刚设置密码时生成的密钥

编辑完成后按esc退出编辑模式,输入‘:wq’退出编辑。

后台运行jupyter[后台运行参考]

完成以上步骤以后,只需要在后台将jupyter运行起来就OK啦:

1
nohup jupyter notebook &

Note: 注意以上运行jupter指令所在的目录,该目录会作为访问时的根目录。

这时当前目录下会生成一个nohup.out文件,运行jupyter notebook的所有标准输出都会重定向至该文件内。可使用

1
jobs

查看后台作业的情况。
若目录不正确可以使用kill中止掉后台进程,进入到期望的目录下后再次运行

1
kill %使用jobs查询到的作业代号

访问远程服务器的Jupyter

在自己的浏览器上输入

1
服务器ip:端口号

即可进入jupyter的登录页面,如下所示
image.png
接下来输入刚刚设置的密码,即可通过jupyter访问服务器啦!

12
Titanium

Titanium

You shoot me down, but I won't fall. I am Titanium.

14 posts
11 categories
42 tags
GitHub E-Mail
© 2020 Titanium
Powered by Hexo
|
Theme — NexT.Gemini v5.1.4
visitors times